Wondershare Filmora for Mac
- Product :Create amazing videos easily using Filmora's wide range of powerful editing tools.
- License : Free Trial
- Price : $49.99
- OS Supported : For Mac OS X 10.9 or later. Fully compatible with Mac OS X 10.12(macOS Sierra )
- Manufacturer : Wondershare
- Support :


Overview
Note: Wondershare Video Editor for Mac is now renamed to Wondershare Filmora for Mac,
customers of Video Editor for Mac can upgrade for free to check out the latest features!
- Support importing all popular videos, audios and photos for editing
- Trim, crop, and rotate videos freely & add voiceover and background music
- Retouch videos and photos with rich filters, titles, transitions and motions?

- Save videos to local or portable devices or directly share to YouTube
- Burn the edited videos to DVD for better video preservation?
-
Filmora 8.0 is here with two
new ways to editWondershare Filmora for Mac V8.0.0 Released!
1. Brand new Action Cam Tool with the capability of Lens distortion correction, Video Stabilization, Audio De-noise, Advanced Speed Control (slow-mo, fast-mo, replay, reverse and freeze frame), as well as color correction.
2. Brand new Instant Cutter for users to trim or merger video files easily and fast with no quality loss! (Supports H.264 encoded MP4, MOV& MTS videos shot by Action Cams, Phones, and Home AVCHD Camcorders.)Modern & Easy to Use
Filmora's delightfully intuitive design makes it easy for anyone
to become a great video editor.Creative Features
Make your videos stand out.
Effects Store
Your source of filters, animated elements,
and other modern video effects.
New Collections added every month!Action Cam Tool
- Correct lens distortion
- Clean up your audio
- New speed controls
Instant Cutter
- Trim or merge clips quickly
- Instant export
Filters and Overlays
- Transform your video with a variety of filters and graphic overlays.
Text and Titles
- Communicate using a huge selection of titles, openers, and lower thirds.
Motion Elements
- Drag and drop moving graphics into your video.
Transitions
- Combine multiple videos and images seamlessly.
Music
- Choose the perfect royalty free song from a library of music made by real
- This version is for All Mac OS X only, if you are windows user, please use this AVS Video Editor
- User guide of Wondershare Vivideo for Mac
-
Screencast

Filmora V8.0.0 - Brand new Action Cam Tool with the capability of Lens distortion correction, Video Stabilization, Audio De-noise, Advanced Speed Control (slow-mo, fast-mo, replay, reverse and freeze frame), as well as color correction.
- Brand new Instant Cutter for users to trim or merger video files easily and fast with no quality loss!(Supports H.264 encoded MP4, MOV& MTS videos shot by Action Cams, Phones, and Home AVCHD Camcorders.)
Filmora V7.8.0 - New advanced color tuning features (Temperature, Tint, Lights, HSL, Vignette and more);
- 45 color presets and supports loading 3D LUTs (Lookup table files) for tuning color of videos and images;
- New Pan and Zoom feature for adding and customizing animation for still images!
- Supports customize animation, font, size or color of Text effects and save as new presets;
- New transition modes without affecting total duration of the two clips;
- New Magnetic Timeline to make texts, effects and overlays bound up with clips on main video track;
- Supports adjusting frame rate and resolution when recording from WebCam;
- UI modification for some popup windows;
- Adds Arabic Localization;
Filmora V7.5.0 - New Audio Denoise function;
- New Audio Equalizer;
- New Track Audio Mixer, supports set the Gain and Pan of the track, virtual surround system;
- Filmora New UI;
Filmora V7.3.0 - Supports two new Effect Packs:Retro 80s and Fashion;
- Supports the all new Effect Store;
- Supports creating animated Gifs;
- Auto rotate videos and photos imported from phones;
- Supports Arabic language in Text Editor, supports OTF fonts;
Filmora V7.2.0 - Supports the all new Spring Effect Pack;
- Supports 10x slo-mo and 10x time-lapse;
- Supports upgrade to 64 bit version on 64 bit OS;
- Fixed minor issues of the 64 bit version;
Filmora V7.1.0 - New 64 bit version to ensure best performance on 64 bit OS!
Filmora V7.0.0 - New Dark skin and skin switcher;
- New text engine with rich text support and new texts templates;
- Real frame by frame control with audio output;
- New Standrad Menu for application;
- Improved export video quality and supports 4K output;
- Added back Message Center;
Filmora V6.8.0 - Video Stabilization;
- Play in Reverse;
- Screen Record;
Filmora V6.7.0 Halloween special version! Filmora V6.6.0 - DVD burning module updated for better compatible with some new DVD Player models;
- Fully compatible with Windows 10;
Filmora V6.5.0 - Improve Green Screen effect
- Replace preview player to solve the crash issue
- Optimize keyboard hotkeys
- Multi-track manager to support multiple text, effect and audio track
Filmora V6.1.0 - Fixed some minor bugs found in the previous version
- Optimized effects library
- Optimized user guide when lauching the program for the first time
- Optimized the Faceoff feature
Filmora V6.0.1 - Shrink the size of installer
- Well support Windows XP
Filmora V6.0.0 - Renamed to Wondershare Filmora(Originally Wondershare Video Editor)
- Newly designed trendy UI and program icons
- New Effects Library: Text & Titles
- New Resource Library: Newly added 25 preset songs resources
Why Choose Video Editor for Mac?
It is powerful and easy-to- master Mac video editing
tool to edit and retouch videos in minutes. It supports almost all video, audio, and
photo formats, and provides useful edits like trimming, cropping, rotating, adding
stylish titles, applying filter effects, transitions, effects, etc. Furthermore, you can
export videos to portable devices like iPhone, iPad, iPod, upload them to YouTube or
burn video to DVD discs.
Wondershare Video Editor for Mac (Mountain Lion and 10.9 Mavericks supported) is powerful yet
easy-to-use video editing software for Mac to edit and personalize videos with rich
editing functions. You can easily trim, crop, rotate, add stylish titles, filter effects,
transition, effects, and more.
Key Features:
Supports bunch of media files.
- You can import any of your homemade or
downloaded SD and HD videos for editing. For example, MP4, FLV, MKV, FLV, WMV,
MOV, AVI, TS, MTS, etc. If you want to insert background music for your video, you
can add all popular audios like MP3, WMA, AAC, AC3, WAV, M4A, OGG, and so on.
Making photo galleries from your BMP, JPG, PNG, GIF photo collection with fancy
transitions can be easily achieved with Wondershare Video Editor for Mac.

Edit and enhance videos and photos efficiently.
- You can easily trim, crop, rotate,
flip videos, change video brightness, contrast, text font, color, size, as well as apply
stylish caption, transitions, or effects from 300+ free templates to bring your home
movies to the next level.

Share your video creation with the worldwide.
- After you finish video editing on
Mac, you can export videos to various formats like WMV, AVI, MOV, or configured
preset for portable devices like iPad mini, iPhone 5,Samsung Galaxy. Uploading your
video content on YouTube or burning videos to DVD discs are also available.

Tech Specifications of Vivideo for Mac
| Supported Input Formats | |
|---|---|
| Video Formats | AVI, DV, DIF, NUT, H261, H264, NSV, FLV, MKV, MP4, M4V, PSP, 3GP, MOV, MPG, MPEG, VOB, DAT, EVO, TS, TP, TRP, M2TS, WMV, ASF, DVR-MS |
| Audio Formats | AAC, AC3, APE, AIF, AIFF, FLAC, APE, CUE, AU, AMR, OGG, WAV, DPE, MKA, M4V, M4A, MPA, MP2, MP3, RA, WMA |
| Photo Formats | JPG, JPEG, BMP, PNG, JPE, GIF, DIB, JFIF, TIF, TIFF |
| Supported Output Formats | |
| Common Video/Audio | WMV, AVI, MOV, FLV, MKV, MP4 Video(AVC), MP4 Video(Xvid), MP4 Video(MC), ASF, M4V, Xvid, DV, MPEG-1 NTSC, MPEG-1 PAL, MPEG-1 SECAM, MPEG-2 NTSC, MPEG-2 PAL, MPEG-2 SECAM, DVD-Video NTSC, DVD-Video PAL, HTML5, DVD-Video SECAM, MP3 |
| HD Video | TS, TRP, AVI, MP4, MPG, WMV, MOV |
| DVD | DVD disc, DVD folder, ISO image file |
| Devices |
|
How to Use Video Editor for Mac
It has never been easier to edit videos on Mac - high compatibility with videos, photos and audios, handy editing tools, professional filters, stylish texts and transitions all make it outstanding.
Free download Wondershare Video Editor for Mac. After downloading, install and launch the program. And then go through below tips on how to edit video, audio and photos using Wondershare Video Editor for Mac before you start.
How to add files to the program
Go to File > Import Media or just drag and drop photos, videos and audio files to the corresponding timeline tracks. The timeline is where you can add multiple images, transition effects, video clips, and audio tracks to it, and weave them into a new creative and blended video footage. You can switch to the storyboard mode by clicking the ![]() button to look at the sequence or ordering of the clips in your project and easily rearrange them.
button to look at the sequence or ordering of the clips in your project and easily rearrange them.
A media browser is also available to import multimedia files from your iTunes library, iMovie, and other media sources. You can transfer recorded videos from a video capture device or directly from the built-in iSight.

How to edit and enhance videos
1. Trim, split, crop, rotate videos and add voiceover
Highlight the video you want to edit and click the Trim, Split, Crop, Rotate and Voiceover button to start editing the video or right click and choose the function you want.

All video editing functions are done in the viewing window with real-time preview like below. Just choose the corresponding editing function.
Trim: You can trim the video directly in the timeline by simply placing the indicator over the video segment that you wanted, right clicking and choosing "Trim to Playhead".
Split: Place the cursor within the Timeline scale at the point where you want to make the cut, then simply click "![]() " button above, to split video into separate segments.
" button above, to split video into separate segments.
Crop: Click Cropping or the "![]() " button in the toolbar and customize the size window to crop the videos. Choose "16:9" or "4:3" option or manually setting the aspect ratio.
" button in the toolbar and customize the size window to crop the videos. Choose "16:9" or "4:3" option or manually setting the aspect ratio.
Rotate: Click Rotation or the "![]() " button in the toolbar to rotate the videos as you like. Rotating 90 degrees clockwise or anti-clockwise, flipping horizontally and vertically are all available.
" button in the toolbar to rotate the videos as you like. Rotating 90 degrees clockwise or anti-clockwise, flipping horizontally and vertically are all available.
Add voiceover: Hit the button "![]() " on the toolbar to add a voiceover to your video. Click "
" on the toolbar to add a voiceover to your video. Click "![]() " to start or end recording. When you finish it, hit the "Done" button to save the recording.
" to start or end recording. When you finish it, hit the "Done" button to save the recording.
Auto Enhance: Tick the Enhance box in the video editing panel and the program will help you automatically enhance the image quality of your video.

2. Enhance videos with titles, filters and adjust video effects
Many free filters and text effects are provided for you to bring your videos to the next level instantly. Double click to highlight the video you want to apply special effects and hit the gear icon on the video to choose the function you need. And then you will see the following window that has four tabs: "Title", "Effect", "Transition" and "Intro/Credit".

Title: 34 stylish text effects are offered. Double click the one you like and type in the words you want to add. You can also freely adjust the text position, font, size, color, etc. and set the text beginning and ending time.
Effect: Choose from 80 professional filter effects and double click the one you like to apply to your video. Like titles, you can also set the filter starting and ending time.
Transition:There are over 50 transition effects for you to choose. Click the button "Transition", and then drag your favorite one to the track over the video or photo clips to apply. Double click the transition between the clips to have a preview and set the transition duration freely. As you can see, you can also apply one favorite transition effect to all the clips or let the software do it randomly for you.
Intro/Credit:Select from various Intro/Credit effects to make your video like a pro.
How to edit and enhance photos
1. Crop, rotate photos and set photo duration
The way to crop and rotate photos and videos are just the same as how to crop and rotate videos. Get real-time preview to ensure everything goes as you like. You can also select a photo and add voiceover to it.

Crop: Click Cropping or the "![]() " button in the toolbar to pop up the Crop window, drag to crop photos. "16:9", "4:3", and manually set the cropping ration are all available.
" button in the toolbar to pop up the Crop window, drag to crop photos. "16:9", "4:3", and manually set the cropping ration are all available.
Rotate: Click Rotation or the "![]() " button in the toolbar to rotate photos for the best effect. Like rotating video, rotating your photo 90 degrees clockwise or anti-clockwise, flipping it horizontally and vertically are all available.
" button in the toolbar to rotate photos for the best effect. Like rotating video, rotating your photo 90 degrees clockwise or anti-clockwise, flipping it horizontally and vertically are all available.
Set photo duration: Click the item between the selected photo and then manually set the photo duration as you like.
2. Enhance photos with titles, filters and motion effects
You can add some title, effects and motions to your photos to make them outstanding immediately. Double click a photo and choose "Effect" or "Title" to open the window below:

You can switch among the tabs freely to enhance your photos in multiple ways. For adding text and filter effects, the ways are the same as adding titles to videos and applying filter effects to videos. Motion can be applied only to photos for better photo effect.
Effect: Choose from 34 professional filter effects and double click the one you like to apply to your photo.
Title: 25 stylish text effects are offered. Double click the one you like and type in the words you want to add. You can also freely adjust the text position, font, size, color, etc.
Motion: Double click the photo and select one of the motions you prefer and double click it to apply. If you want to remove the motion, click the Reset icon.
How to edit and enhance audio
Sometimes, you may like to add some background music to your photos and videos or insert some special sound effects. Drag the audio clip to make it fit for your videos and photos. For audios, there are two editing functions: trimming and audio adjustment. Click the gear icon below an audio clip and choose the editing function you like. Alternatively, you can highlight the audio track and click the trim button or edit button on the tool bar.

Trim: Drag the two flags to choose the audio clip you want. You can preview it to get the precise segment. If you are not satisfied, just click "Reset" and do it again.
Audio effect: Double click to freely adjust the audio volume and set audio fade in/out effect by dragging the slider bar.
How to add more effects to photo and video clips
Video Editor provides more effects which makes video editing funny than ever. Now it comes with Face-Off effect, Tilt-Shift effect and Mosaic Blur effect. To add these three effects to a video clip, select the video and click Power Tool button in the middle tool bar.
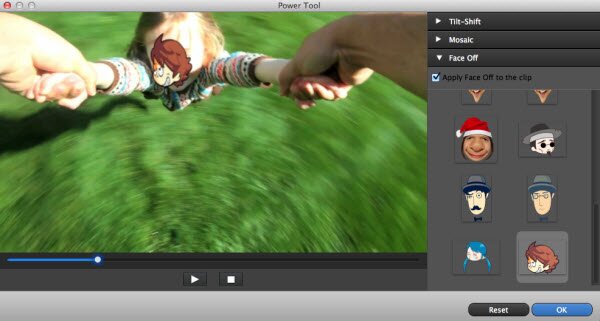
Tilt-Shift: This is a cool effect which highlights the selected area and blur the rest. To apply it, tick the option first, and then move, resize and rotate the axis on the left window.
Mosaic Blur: This effect lets you blur any area of your video. Go to Mosaic tab and tick the option, then set the area you want to blur. If you want to blur more areas, just click Add. You can also change the Percent option to adjust the mosaic style.
Face-Off: This effect will automatically add a funny face to the detected faces in the video clip. To do so, go to the Face Off tab, choose the option and select a face you like. Then preview the final result by clicking the Play button.
How to overlay multiple videos (Picture-in-Picture)
The PIP (picture-in-picture) feature allows you to embed up to 9 different overlay videos to the main video.
Simply drag and drop the overlay elements to the timeline PIP tracks, and then double click the PIP elements to customize and refine them in further details.
You can also choose and apply additional “Mask” and “Motion” special effects to the overlay videos from the advanced "Inspector" menu.

How to make a Green Screen video (Chroma Key effect)
If you shoot a video in front of solid color backdrops, Green Screen tool can make the solid color transparent. Replace it with other phenomenal landscape or background, you can create studio-like special effects like the ones you seen on TV.
Turn on the "Inspector" menu while you have the green screen video footage selected. Open up the Green Screen menu, and use Chroma Key picker, click on the solid color background of the video to select the default Chroma Key color.
Now, hover your mouse over the PIP region where the solid color background is, the pointer will magically “suck up” all the Chroma Key color, and make the background transparent.
Congratulation! You just made your very first Hollywood blockbuster!

How to share the edited videos
Click Export on the primary window to reveal the output window. Here, you can choose from different ways to save your creation: "Creating Video", "Exporting to Device", "Uploading to YouTube, Vimeo and Facebook" and "Burning DVD". Select the way you want to share your videos and click Create.

1. Click Formats to choose your target format, rename the file, and specify the output location on your Mac.
2. Click Devices to make the video optimized for your portable devices, including iPhone 5s/5/4s, iPad, iPod, PSP, Zune, etc.
3. Click YouTube, Vimeo and Facebook to fill in the necessary information and share your excellent video with others on these sites instantly.
4. Click DVD to choose from DVD disc, DVDMedia, ISO and DVD Folder to output your videos, and then select the burning speed, destination folder, DVD title, video mode, video quality, etc. and save your videos.